Posts
Posts


AGRICULTURAL SCIENECE WAEC GCE 2021/2022 EXPO
-
AGRICULTURAL SCIENECE WAEC GCE 2021/2022 EXPO section A OBJECTIVES
1. The branch of agriculture that deal with structure and form of the
body is called...

GET PROJECT MATERIALS - Click HERE Now

Showing posts with label WINDOWS. Show all posts
Showing posts with label WINDOWS. Show all posts
How to download Windows Mobile Freeware Applications for Free
Do you own a Windows Mobile? then i bet you
would like to download Windows Mobile
Freeware Applications and Games. that is free
from VIRUS. Windows Mobile Application is
different from other mobile phone applications, we
have research the best three free downloading
websites where you can download your windows
mobile applications, games and other goodies.
Best Website to Download Free Windows
Mobile Applications
1. Xda Developers Forum- This is a windows mobile
forum where you can get solution to your windows
mobile problems, and also download free application
for your device.
Website 2: FreeWarePocketPc net, This windows
mobile website is packed filled with free application
downloads. You can check it out.
website 3: Download.Cnet, This is my favorite
downloading site, i always check out the best and
popular application downloads, and if it is something
i need, i don't hesitate to download it. You can scroll
down and see the top downloads, examples of
applications you will see there is Skype for Windows
mobile.
Youtube for windows mobile and many more.
Enjoy and share.
Recent posts: How To Unlock Nokia Mobile Phone
Instantly and Free!
NIGERIA TECHNOLOGY GUIDE - Naijatechguide.comm
COMPUTER SOLUTIONS
www.naijasoftwarecheats.blogspot.com
www.softwarecheats.blogspot.com
+234-70-307-2291-1
* SYSTEM REPAIRS
* FILE RECOVERY
* FORMAT & RELOAD
* TROUBLESHOOTING
* FREE INTERNET BROWSING
* SOFTWARE INSTALLATIONS
* CYBER CAFE INSTALLATION
* NETWORKING COMPUTERS
* FAST LINK MODEM CRACKING
* LATOP / PHONE CONFIGURATION
* ANTIVIRUS WITH LINCENCE KEY
* SALES AND MAINTENANCE OF LAPTOPS &
DESKTOPS (NEW & FAIRLY USED)
CALL US: +234-70-307-2291-1
We offer FREE software and cheats for FREE internet
browsing, configurations,tweaks,
tutorials,information, events, computer literacy, sales,
maintenance and repairs of phones & laptops/
desktops original antivirus and general contractors.
©2010 MARTINS INTERNET TECHNOLOGY
HOW TO MAKE PHONE CALLS USING COMPUTER (PC) - LAPTOPS AND DESKTOPS
By the time using your computer, you might have
wished to partition your hard drive. Perhaps, the
reason might be to dual boot or secure some separate
partition for backing up old or important data. You
might be guessing that I would suggest you to
download some tools. But it’s not like that, I am not
going to suggest you those old tricks that says to back-
up your data and place it in separate storage device
and partition it again and again it to one of your
partition.
In Windows 7, there is simple way to do it. Today in this
tutorial, I’ll be guiding you through the each and every
steps with screenshots.
Before starting note that,
- We can partition any drive, even a system drive
- We can do it only in Windows, Windows 7 and
Vista specifically
So let’s divide it.
Go to Start > Right click on My Computer and choose
Manage.
Disk Management Window will Pop-up, it may take time
to load it since it fetches for all the hardware and
system information in your PC. After it’s fully loaded, go
to Storage> Disk management at the left sidebar. This
is where we’ll have all the information about storage
devices that are in our PC currently connected and
active.
At the right column all the storage media will be listed
with their basic information like File system type, and
status. Now choose the Volume that you want to
partition. Right Click on it and select Shrink Volume
option from menu.
As soon as you click on the Shrink Volume option,
system will search for available space in your selected
Disk Volume.
This will not take much longer than few seconds. After
querying, Shrink window will pop-up. This is where
you’ll have to specify the Volume for next partition.
Look at the total size of available shrink space. Below it,
you’ll have to Enter the space to shrink.
You must make sure that the size is not below the total
size of space taken by files in that drive.
You can check the used space by right clicking on the
drive you are going to partition and choose Properties.
Click on Shrink button after specifying the size to
shrink. The shrink size is for the value for the partition
where your old files will be contained and remaining
size will allocated for your next partition.
But you’ll still not able to access this new drive. You’ll
have to format it and specify the drive letter to access
them. To do so, continue reading.
Right click on unallocated drive and choose New
Simple Volume option.
New Simple Volume Wizard Window will popup.
Click on Next button to continue.
In next window, you’ll have to specify the size for your
new volume. Set full size if you are satisfied with two
partitions; else divide it again for new partition.
Next choose any drive letter from the available list and
click on Next button.
In next window, leave everything as default but make
sure it’s similar to the screen below:
Click on Finish window to complete the wizard.
If you’ve autoplay enabled in your computer, then New
Volume will be auto played for the first and last time.
Go to my Computer to see your new drive ready.
With similar method you can also format your empty
drive to create multiple partitions.
Hope you post was helpful. Subscribe to our feed for
more interesting articles.
How to Format And Install Windows From Your USB.

Do u ever faced a problem of not having a DVD rom in your machine. Then don't worry here is the solution. I just did this method on one of my machine and installed the new Windows 7 . The main advantage is that by using USB drive you will be able to install Windows 7/ Vista in just 15 minutes. You can also use this bootable USB drive on friend’s computer who doesn’t have a DVD optical drive. The method is very simple and you can use without any hassles. Needless to say that your motherboard should support USB Boot feature to make use of the bootable USB drive. Requirements: *USB Flash Drive (Minimum 4GB) *Windows 7 or Vista installation files. Follow the below steps to create bootable Windows 7/ Vista USB drive using which you can install Windows 7/ Vista easily. 1. Plug-in your USB flash drive to USB port and move all the contents from USB drive to a safe location on your system. 2. Open Command Prompt with admin rights. Use any of the below methods to open Command Prompt with admin rights. *Type cmd in Start menu search box and hit Ctrl+ Shift+ Enter. Or *Go to Start menu > All programs > Accessories, right click on Command Prompt and select Run as administrator. 3. You need to know about the USB drive a little bit. Type in the following commands in the command prompt: First type DISKPART and hit enter . Next type LIST DISK command and note down the Disk number (ex: Disk 1) of your USB flash drive. 4. Next type all the below commands one by one. Here I assume that your disk drive no is “Disk 1”.If you have Disk 2 as your USB flash drive then use Disk 2.Refer the above step to confirm it. So below are the commands you need to type and execute one by one: SELECT DISK 1 CLEAN CREATE PARTITION PRIMARY SELECT PARTITION 1 ACTIVE FORMAT FS=NTFS (Format process may take few seconds) ASSIGN EXIT Don’t close the command prompt as we need to execute one more command at the next step. Just minimize it. 5. Next insert your Windows7/Vista DVD into the optical drive and check the drive letter of the DVD drive. In this guide I will assume that your DVD drive letter is “D” and USB drive letter is “H” (open my computer to know about it). 6. Maximize the minimized Command Prompt in the 4th step.Type the following command now: D: CD BOOT and hit enter. Where “D” is your DVD drive letter. CD BOOT and hit enter . 7. Type another command given below to update the USB drive with BOOTMGR compatible code. BOOTSECT.EXE /NT60 H: Where “H” is your USB drive letter. 8. Copy your Windows 7/Vista DVD contents to the USB flash drive. 9. Your USB drive is ready to boot and install Windows 7/Vista. Only thing you need to change the boot priority at the BIOS to USB from the HDD or CD ROM drive. I won’t explain it as it’s just the matter the changing the boot priority or enabling the USB boot option in the BIOS. Note: If you are not able to boot after following this guide means you haven’t set the BIOS priority to USB. If you got any problem in following this guide feel free to ask questions by leaving comment
HOW COMPUTER VIRUSES ARE TRANSMITTED
 Computer viruses have come to stay and there’s nothing we can do about that.
However it is extremely important to know how they are transmitted if we want to
prevent them.
Computer viruses have come to stay and there’s nothing we can do about that.
However it is extremely important to know how they are transmitted if we want to
prevent them.-These days, most of the viruses spread due to receiving spam e-mail messages that contains viruses. When a an unsuspecting user opens such an infected message, the virus is also loaded into the computer memory. Many other program files become infected with the virus and become corrupt and useless. Some viruses even trigger automated messages. Do not open spam mails at all. Open only e-mails from known and trusted senders.
-The internet and local area networks also serve as a breeding ground for viruses. When you download executable files from the internet, shared online disc and other unmonitored file sharing sites, your computer can get infected. In most cases, free PHP or ASP scripts are the main source of virus, always get these scripts from reliable sources. If a computer is infected with a virus in
Using your Flash Drive as RAM to Speed Up your Computer
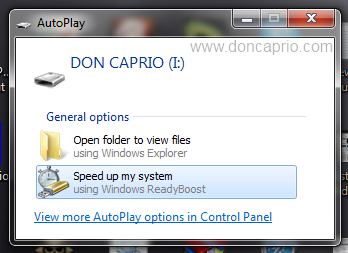 While most people know this, a great deal of Windows users do not know that
the ReadyBoost feature in Windows can make you utilize your flash drive as
randon access memory (RAM) to speed up your computer. ReadyBoost allows you to
use a USB drive to help cache memory. This helps improve the amount of physical
memory available and increases the productivity of the hard drive installed in a
system. For those with low RAM installed on their computer, ReadyBoost can make
a big difference in some situations in how it performs. When I need to run
programs that takes lots of system resources, ReadyBoost comes in handy.
While most people know this, a great deal of Windows users do not know that
the ReadyBoost feature in Windows can make you utilize your flash drive as
randon access memory (RAM) to speed up your computer. ReadyBoost allows you to
use a USB drive to help cache memory. This helps improve the amount of physical
memory available and increases the productivity of the hard drive installed in a
system. For those with low RAM installed on their computer, ReadyBoost can make
a big difference in some situations in how it performs. When I need to run
programs that takes lots of system resources, ReadyBoost comes in handy.How to Use ReadyBoost to Make Windows 7 Run Faster
To use your flash drive as RAM, it is recommened that the pen drive has a disk space of about 2GB but a 1GB flash drive too can still perform to some extent though it might be that effective. Microsoft recommends the amount of flash memory for ReadyBoost acceleration be one to three times the amount of random access
2012 Internet Browser Software Product Comparisons

LIKE OUR REVIEWS? SUPPORT OUR SITE BY LIKING US ON FACEBOOK OR GOOGLE PLUS
Subscribe to:
Posts (Atom)

SHOP & BUY AT REDUCED RATES FROM ANYWHERE CALL +2347030722911